Black Orange Pumpkins White Ghost Silhouettes Halloween Nails - Halloween Nail Art nail art - featuring nail art, black, white, halloween - nail art inspiration and design ideas
Black Orange Pumpkins White Ghost Silhouettes Halloween Nails
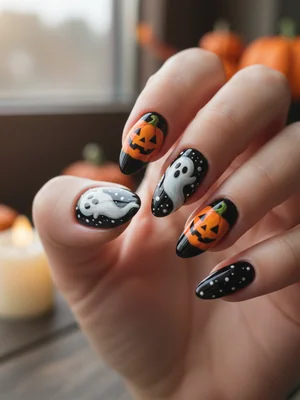
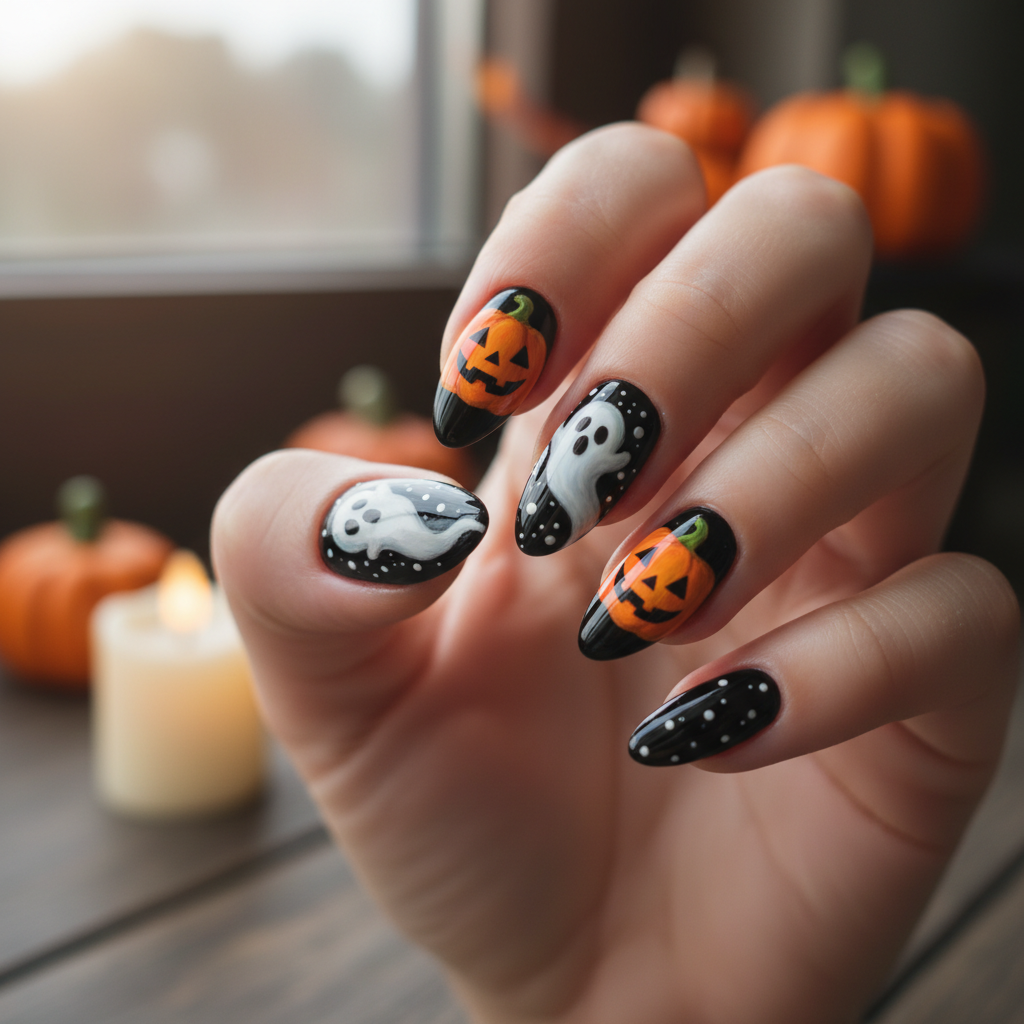
Spooky Ghost & Pumpkin Halloween Nail Art | Black & Orange
Get ready for Halloween with this adorable and spooky nail design! Featuring a black base, playful orange pumpkins, and cute white ghost silhouettes, these nails are perfect for celebrating the spooky season in style.
Spooky Ghost & Pumpkin Halloween Nail Art | Black & Orange
Get ready for Halloween with this adorable and spooky nail design! Featuring a black base, playful orange pumpkins, and cute white ghost silhouettes, these nails are perfect for celebrating the spooky season in style.
- Black nail polish
- Orange nail polish
- White nail polish
- Fine detail brush
- Dotting tool
- Top coat
- Apply a base coat and then 2 coats of black nail polish.
- Using a fine detail brush and orange polish, paint small pumpkin shapes on desired nails.
- With white polish and a fine brush, create ghost silhouettes on other nails.
- Use a dotting tool and white polish for ghost eyes.
- Let the design dry completely.
- Finish with a glossy top coat to seal and protect the design.
Colors in This Design
Expert Tip
Use thin layers of polish to prevent smudging and allow each layer to dry completely before adding the next. A steady hand and good lighting are crucial for detailed designs.
Similar Styles

Black Green Witch Hats Purple Glitter Halloween Nails
Spooky Halloween nail art with black base, green witch hats, and purple glitter

Orange Black Stripes White Ghosts Halloween Nails
Halloween nail art with orange base, black stripes, and tiny white ghosts

Festive Halloween Orange Black Cats White Halloween Nails
Festive Halloween nails with orange base, black cats, and white moon details

Black Orange Pumpkins White Ghost Silhouettes Halloween Nails
Spooky Halloween nail art with black base, orange pumpkins, and white ghost silhouettes

Halloween Black White Skulls Red Blood Halloween Nails
Halloween nail design featuring black base, white skulls, and red blood drips

Spooky Halloween Black Orange Pumpkins Green Halloween Nails
Spooky Halloween nails with black base, orange pumpkins, and green witch details

Festive Halloween Orange Black Cats White Halloween Nails
Festive Halloween nails with orange base, black cats, and white moon details

Orange Black Stripes White Ghosts Halloween Nails
Halloween nail art with orange base, black stripes, and tiny white ghosts
Explore Similar Designs
Techniques Used
Nail Shapes
Frequently Asked Questions
What kind of brush is best for the detailed work?
A very fine detail brush or a nail art liner brush is ideal for creating the pumpkins and ghost silhouettes.
Can I use nail stickers instead of painting the designs?
Yes, you can use pumpkin and ghost nail stickers as an alternative to hand-painting.
How long will this design last?
With proper maintenance and top coat application, the design can last up to a week.
Is it okay to use gel polish for this design?
Yes, you can use gel polish for this design, curing each layer under a UV/LED lamp.
Can I do this design on acrylic nails?
Yes, just be sure to prep the surface properly.
Do I have to use black for the base?
No, you can use another dark color such as deep purple or navy blue.
Aftercare Tips
- ✓Moisturize hands and cuticles daily.
- ✓Wear gloves when doing housework or gardening.
- ✓Avoid using nails as tools to prevent breakage.
Safe Removal
- 1.Soak cotton balls in acetone-based nail polish remover.
- 2.Place cotton balls on nails and wrap with foil for 10-15 minutes.