
Beautiful Photo-real Salon Sponge Nails - Sponge nail art - featuring nail art, red - nail art inspiration and design ideas
Beautiful Photo-real Salon Sponge Nails
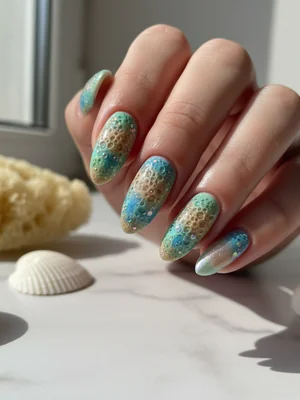
Photo-Real Salon Sponge Nails: Ethereal Gradient Artistry
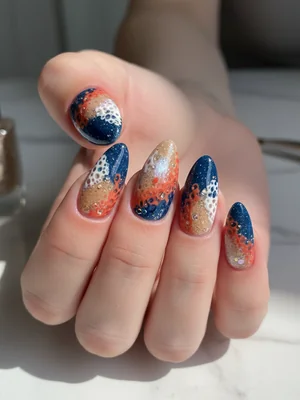
Experience the captivating depth of our Photo-Real Salon Sponge Nails, a design where multiple hues blend seamlessly to create a truly ethereal, almost airbrushed effect. This sophisticated nail art mimics natural phenomena, offering a luxurious, high-gloss finish that speaks volumes about your refined taste.
Photo-Real Salon Sponge Nails: Ethereal Gradient Artistry
Experience the captivating depth of our Photo-Real Salon Sponge Nails, a design where multiple hues blend seamlessly to create a truly ethereal, almost airbrushed effect. This sophisticated nail art mimics natural phenomena, offering a luxurious, high-gloss finish that speaks volumes about your refined taste.
- Gel Base Coat
- Gel Top Coat (No-Wipe, High-Gloss)
- Non-Latex Makeup Sponge Wedges
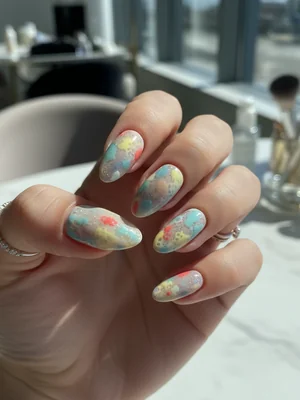
- Gel Polishes in Sky Blue, Lavender, Peach
- Fine Glitter Gel Polish (Silver)
- Gel Brush and Clean-Up Brush
- Lint-Free Wipes and Isopropyl Alcohol
- **Prep & Base:** File, buff, push cuticles, dehydrate nails. Apply one thin layer of gel base coat and cure.
- **First Color Layer:** Apply two thin coats of a sheer nude or light base gel polish, curing each layer. This creates a clean canvas.
- **Sponge Gradient - Layer 1:** On a palette, dab small amounts of Sky Blue and Lavender gel polish side-by-side. Lightly dab a makeup sponge into both colors, then gently 'sponge' onto the nail, starting from the cuticle area. Cure lightly.
- **Sponge Gradient - Layer 2:** Repeat the sponging with Lavender and Peach Blush, overlapping slightly with the first layer, focusing more towards the tip. Add a very light touch of Silver Shimmer gel polish with the sponge if desired, for that 'photo-real' depth. Cure thoroughly.
- **Refine & Seal:** Clean up any polish on the skin with a clean-up brush dipped in alcohol. Apply a high-gloss, no-wipe gel top coat, ensuring a smooth, even finish over the blended design. Cure completely for a salon-quality shine.
- **Hydrate:** Finish with cuticle oil for nourished cuticles and a polished look.
Expert Tip
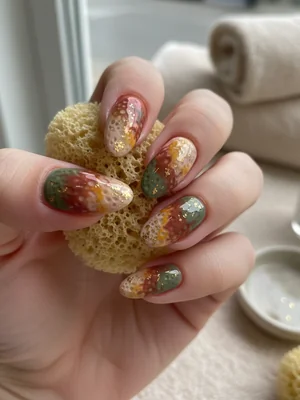
Achieving the 'photo-real' effect requires a very light hand and multiple, thin layers with your sponge. Instead of pressing hard, gently 'stipple' the colors, building up the blend gradually for that seamless, almost airbrushed transition.
Similar Styles
Beautiful Photo-real Salon Sponge Nails
Sponge inspired nail art with beautiful, photo-real finish and professional salon quality
Gorgeous Photo-real Salon Sponge Nails
Sponge inspired nail art with gorgeous, photo-real finish and professional salon quality
Gorgeous Photo-real Salon Sponge Nails
Sponge inspired nail art with gorgeous, photo-real finish and professional salon quality
Stunning Photo-real Salon Sponge Nails
Sponge inspired nail art with stunning, photo-real finish and professional salon quality
Stunning Photo-real Salon Sponge Nails
Sponge inspired nail art with stunning, photo-real finish and professional salon quality
Sophisticated Photo-real Salon Sponge Nails
Sponge inspired nail art with sophisticated, photo-real finish and professional salon quality
Sophisticated Photo-real Salon Sponge Nails
Sponge inspired nail art with sophisticated, photo-real finish and professional salon quality
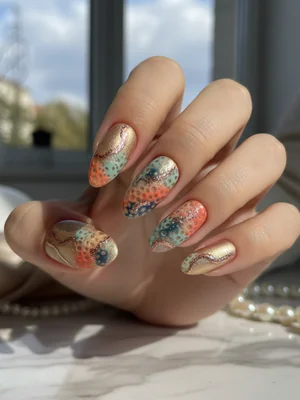
Photo-real Salon Sponge Nails
Sponge inspired nail art with elegant, photo-real finish and professional salon quality
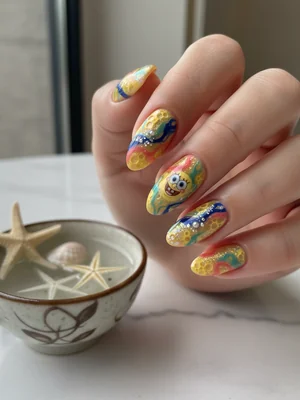
Photo-real Salon Sponge Nails
Sponge inspired nail art with elegant, photo-real finish and professional salon quality

Photo-real Salon Sponge Nails
Sponge inspired nail art with clean, photo-real finish and professional salon quality

Photo-real Salon Sponge Nails
Sponge inspired nail art with clean, photo-real finish and professional salon quality

Photo-real Salon Sponge Nails
Sponge inspired nail art with clean, photo-real finish and professional salon quality
Explore Similar Designs
Colors in this Design
Perfect For
Nail Shapes
Frequently Asked Questions
What makes this 'photo-real' compared to a regular sponge design?
The 'photo-real' aspect comes from the meticulous layering and blending of multiple, often subtle, colors with the sponge. This creates an exceptionally smooth, gradient transition with perceived depth, much like a finely rendered image, rather than a simple textured or dotted sponge effect.
How long does this Photo-Real Salon Sponge Nails design last?
With proper gel polish application and aftercare, this design typically lasts 2-3 weeks before new growth becomes noticeable or a refresh is desired.
Is this design suitable for shorter nails?
While longer nails provide a larger canvas for the intricate blending, the 'photo-real' effect can still be achieved on medium-length nails, though the gradient might be slightly more condensed.
Can I request specific color combinations for this design?
Absolutely! The beauty of this advanced sponge technique is its adaptability. We can customize the color palette to perfectly match your preferences or outfit.
Will the sponge texture be visible on the nail?
No, the goal of this specific Photo-Real Salon Sponge Nails design is a seamless, smooth finish. The multi-layered sponging and a high-gloss top coat eliminate any noticeable texture, leaving a polished, almost airbrushed appearance.
Does this technique damage natural nails?
When applied and removed by a professional nail technician using high-quality gel products, this technique is safe and will not damage your natural nails.
Aftercare Tips
- ✓Keep nails dry and avoid excessive water exposure for the first few hours after your appointment.
- ✓Apply a quality hand cream regularly to keep hands and nails moisturized.
- ✓Refrain from picking or peeling the gel polish, as this can damage your natural nail.
- ✓Report any lifting or chipping to your nail technician promptly for touch-ups.
Safe Removal
- 1.Gently file off the top coat to break the seal, being careful not to file into your natural nail.
- 2.Soak cotton pads in acetone, place them on each nail, and wrap with foil for 10-15 minutes.
- 3.Gently push off softened gel polish with a wood stick or cuticle pusher; never force it. Moisturize nails after.