Photo-real Salon Ocean Nails
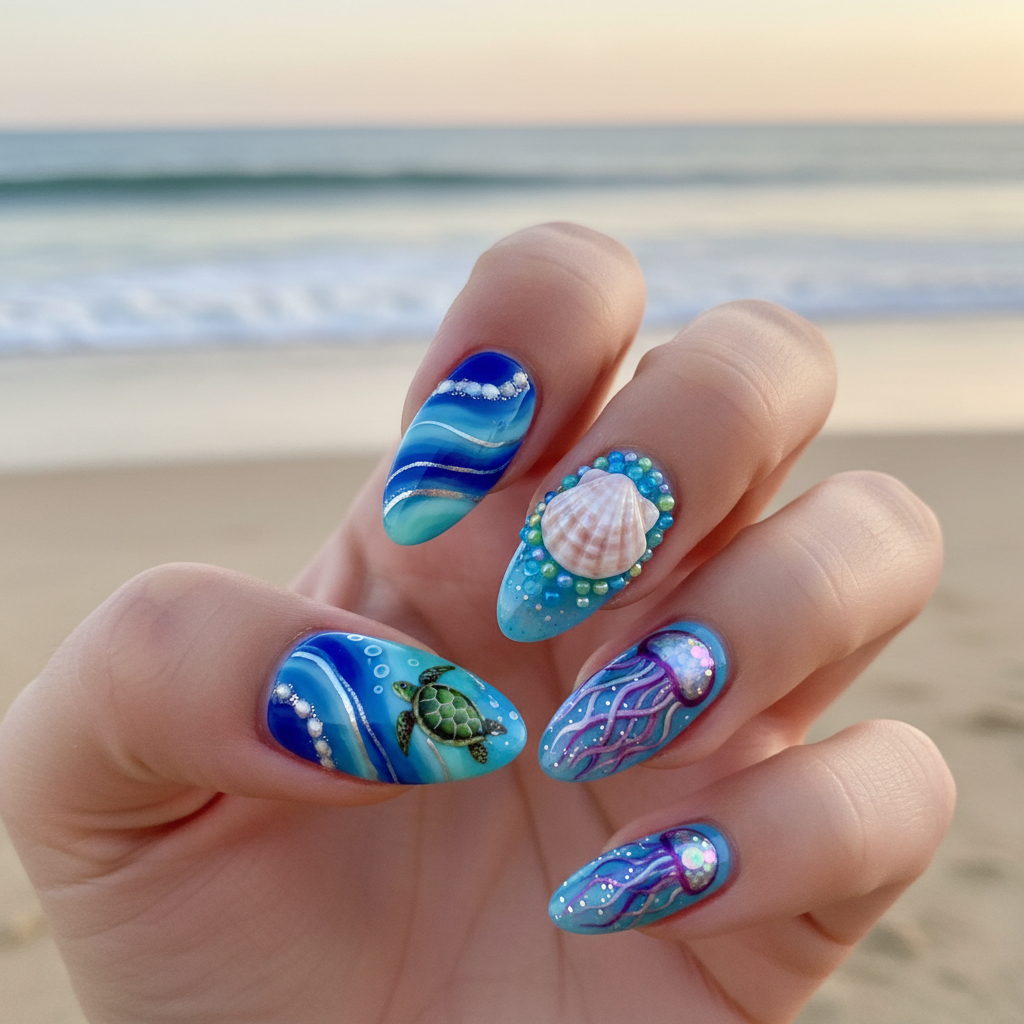
Photo-real Salon Ocean Nails - Ocean nail art - featuring nail art, red - nail art inspiration and design ideas
Photo-Real Ocean Nails: Salon-Quality Wave Design Art
Capture the stunning beauty of the sea with our photo-real ocean nail art. This intricate design uses advanced layering techniques to create realistic, cresting waves and deep blue waters with a flawless, high-gloss finish. It's a wearable piece of art that brings the salon-quality ocean to your fingertips.
- Multiple shades of blue and white gel polish
- Blooming gel for water effects
- Fine liner nail art brush (00 or 000 size)
- High-quality, non-wipe gel top coat
- Sheer nude or light blue gel base coat
- Professional UV/LED curing lamp
- After nail prep, apply a sheer nude or light blue gel base coat to create a natural-looking depth, then cure.
- Apply a layer of deep blue gel. While wet, dot with lighter blues and use a fine brush to gently swirl, creating a deep water effect. Cure.
- On a new clear layer (or using blooming gel), apply a thin line of white gel polish. Allow it to bloom slightly to create the soft base of the seafoam, then flash cure.
- Using a fine liner brush and an undiluted white art gel, hand-paint the fine, crisp details of the cresting wave and sea spray. Cure fully.
- Add subtle hints of light aqua near the wave crest to create the illusion of translucent water. Cure.
- Finish with two layers of a high-gloss, non-wipe top coat to encapsulate the art and create a smooth, 'wet' look. Cure each layer completely.
Expert Tip
For the most realistic seafoam, use a slightly thicker white art gel. After painting the fine lines, flash cure for 10 seconds immediately to prevent the gel from self-leveling and to lock in the delicate texture before the full cure.
Explore Similar Designs
Colors in this Design
Perfect For
Nail Shapes
Frequently Asked Questions
How long does a photo-real ocean nail design last?
With proper care and a durable gel application, this design can last 2-4 weeks without chipping or significant fading.
Can this be done with regular nail polish?
Achieving a true photo-real effect with depth is extremely difficult with regular polish due to its fast drying time. This design is best executed with gel polish for its blendability and curing control.
Does this design damage your natural nails?
The nail art itself does not cause damage. Any potential damage is typically caused by improper nail preparation or removal. We always recommend professional services.
What nail shape works best for ocean waves?
Longer shapes like almond, coffin, or stiletto provide the best canvas to showcase the full, sweeping motion of the wave art and enhance the realism.
Is this design textured or smooth?
A professional application will result in a perfectly smooth, high-gloss finish. All the detailed art is fully encapsulated within layers of gel top coat for a flawless feel.
How do you make the water look so real?
The realism comes from a layering technique using multiple shades of blue gel, a blooming effect for soft blending, and crisp, hand-painted white details for the seafoam.
Aftercare Tips
- ✓Be gentle with your nails for the first 24-48 hours post-appointment.
- ✓Avoid prolonged exposure to hot water (e.g., saunas, hot tubs) for 48 hours.
- ✓Moisturize your hands and cuticles regularly to enhance the look of your manicure.
- ✓Do not pick or file the design, as this can break the top coat's seal.
Safe Removal
- 1.Professional removal is highly recommended to protect the natural nail from damage due to the multiple layers of gel.
- 2.The process involves gently filing the top coat to break the seal, followed by an acetone soak-off.
- 3.Never peel or force the gel off, as it can strip layers of your natural nail.